之前在CentOS7安装php7.1的时候有遇到PHP源及PHP7.1不支持MySQL扩展问题,上午抽空安装了下终于解决了这两个问题,特此记录备忘。
简单安装(yum方式)
安装软件源
添加epel源
1
2
[root@opstrip.com opt]# rpm --import /etc/pki/rpm-gpg/RPM-GPG-KEY* [root@opstrip.com opt]# rpm -Uvh http://dl.fedoraproject.org/pub/epel/7/x86_64/e/epel-release-7-10.noarch.rpm
备用源:http://mirrors.rit.edu/fedora/epel/7/x86_64/e/epel-release-7-10.noarch.rpm
添加remi源
1 [root@opstrip.com opt]# rpm -Uvh http://rpms.remirepo.net/enterprise/remi-release-7.rpm
安装并更新软件
安装yum-config-manager实用程序
1 [root@opstrip.com opt]# yum -y install yum-utils
更新系统当前软件版本
1 [root@opstrip.com opt]# yum -y update
更新完成后,就可以安装所需要的PHP版本了。
安装PHP
以上准备工作完成后,就可以安装所需的PHP版本了。
对于PHP5.4
1 [root@opstrip.com opt]# yum -y install php
安装前可尝试yum search php54搜索可安装的软件包。
对于PHP7.0
1
2
[root@opstrip.com opt]# yum-config-manager --enable remi-php70 [root@opstrip.com opt]# yum -y install php php-opcache
安装前可尝试yum search php70搜索可安装的软件包。
对于PHP7.1
1
2
[root@opstrip.com opt]# yum-config-manager --enable remi-php71 [root@opstrip.com opt]# yum -y install php php-opcache
安装前可尝试yum search php71搜索可安装的软件包。
完成后还需要添加PHP常用扩展:
1 [root@opstrip.com opt]# yum -y install php-mysql php-gd php-ldap php-odbc php-pear php-xml php-xmlrpc php-mbstring php-soap curl curl-devel
对于Nginx
1 [root@opstrip.com opt]# yum -y install nginx nginx-mod-http-perl nginx-mod-stream nginx-filesystem nginx-mod-mail nginx-mod-http-image-filter nginx-all-modules nginx-mod-http-geoip nginx-mod-http-xslt-filter
安装前仍建议尝试yum search nginx搜索可安装的软件包。
安装完成后配置PHP及Nginx并启动用以测试phpinfo页面,这时候应该能正常显示。
源码编译安装
安装前的准备
下载PHP安装包
1 [root@opstrip.com opt]# wget -O php-7.1.5.tar.gz http://cn2.php.net/distributions/php-7.1.5.tar.gz
解压
1 [root@opstrip.com opt]# tar xf php-7.1.5.tar.gz
安装依赖包
1 [root@opstrip.com php-7.1.5]# yum install -y libxml2 libxml2-devel openssl openssl-devel bzip2 bzip2-devel libcurl libcurl-devel libjpeg libjpeg-devel libpng libpng-devel freetype freetype-devel gmp gmp-devel libmcrypt libmcrypt-devel readline readline-devel libxslt libxslt-devel
配置安装
编译配置
1
2
3
4
5
6
7
8
9
10
11
12
13
14
15
16
17
18
19
20
21
22
23
24
25
26
27
28
29
30
31
32
33
34
35
36
37
38
39
40
41
42
43
44
45
46
47
48
49
50
51
52
53
54
55
56
57
58
59
60
61
62
63
64
65
66
67
68
69
[root@opstrip.com opt]# cd php-7.1.5 [root@opstrip.com php-7.1.5]# ./configure \ --prefix=/usr/local/php \ --with-config-file-path=/etc \ --enable-fpm \ --with-fpm-user=www \ --with-fpm-group=www \ --enable-inline-optimization \ --disable-debug \ --disable-rpath \ --enable-shared \ --enable-soap \ --with-libxml-dir \ --with-xmlrpc \ --with-openssl \ --with-mcrypt \ --with-mhash \ --with-pcre-regex \ --with-sqlite3 \ --with-zlib \ --enable-bcmath \ --with-iconv \ --with-bz2 \ --enable-calendar \ --with-curl \ --with-cdb \ --enable-dom \ --enable-exif \ --enable-fileinfo \ --enable-filter \ --with-pcre-dir \ --enable-ftp \ --with-gd \ --with-openssl-dir \ --with-jpeg-dir \ --with-png-dir \ --with-zlib-dir \ --with-freetype-dir \ --enable-gd-native-ttf \ --with-ldap \ --with-gettext \ --with-gmp \ --with-mhash \ --enable-json \ --enable-mbstring \ --enable-mbregex \ --enable-mbregex-backtrack \ --with-libmbfl \ --with-onig \ --enable-pdo \ --with-mysqli=mysqlnd \ --with-pdo-mysql=mysqlnd \ --with-zlib-dir \ --with-pdo-sqlite \ --with-readline \ --enable-session \ --enable-shmop \ --enable-simplexml \ --enable-sockets \ --enable-sysvmsg \ --enable-sysvsem \ --enable-sysvshm \ --enable-wddx \ --with-libxml-dir \ --with-xsl \ --enable-zip \ --enable-mysqlnd-compression-support \ --with-pear \ --enable-opcache
具体可以参考PHP官方安装说明文档:http://php.net/manual/zh/install.unix.nginx.php
编译安装
1 [root@opstrip.com php-7.1.5]# make && make install
配置环境变量:/etc/profile末尾追加export PATH=$PATH:/usr/local/php/bin,然后执行source /etc/profile生效后查看php版本:
1
2
3
4
[root@opstrip.com php-7.1.5]# php -v PHP 7.1.5 (cli) (built: May 31 2017 16:12:38) ( NTS ) Copyright (c) 1997-2017 The PHP Group Zend Engine v3.1.0, Copyright (c) 1998-2017 Zend Technologies
安装后的配置
配置php-fpm
安装完成后可以通过sapi/fpm/php-fpm.server来启动php-fpm了。不过为了以后管理方便,通常需要将配置文件统一放到/etc目录下,并将php-fpm.server添加至systemctl服务。如下:
1
2
3
4
5
[root@opstrip.com php-7.1.5]# mkdir -p /etc/php-fpm.d [root@opstrip.com php-7.1.5]# cp php.ini-production /etc/php.ini [root@opstrip.com php-7.1.5]# cp sapi/fpm/php-fpm.service /usr/lib/systemd/system/ [root@opstrip.com php-7.1.5]# cp sapi/fpm/php-fpm.conf /etc/ [root@opstrip.com php-7.1.5]# cp sapi/fpm/www.conf /etc/php-fpm.d/
然后更改/usr/lib/systemd/system/php-fpm.service文件使其执行正确的路径,如下:
1
2
3
4
5
6
7
8
9
10
11
12
13
14
15
16
17
18
19
[root@opstrip.com php-7.1.5]# vi /usr/lib/systemd/system/php-fpm.service [Unit] Description=The PHP FastCGI Process Manager After=network.target [Service] Type=simple PIDFile=/var/run/php-fpm.pid ExecStart=/usr/local/php/sbin/php-fpm --nodaemonize --fpm-config /etc/php-fpm.conf ExecReload=/bin/kill -USR2 $MAINPID PrivateTmp=true [Install] WantedBy=multi-user.target
启动php-fpm
第一次通过systemctl启动PHP服务时需要先将php-fpm服务enable:
1
2
[root@opstrip.com php-7.1.5]# systemctl enable php-fpm.service [root@opstrip.com php-7.1.5]# systemctl start php-fpm.service
编译安装Nginx
详见前文 ,并根据需要配置并启动Nginx。这里就不在写了。
开启MySQL扩展(仅编译安装)
由于PHP7已经完全移除了MySQL的扩展支持(由mysqli与mysqlnd取代),因此一些老的软件在升级PHP版本后会报类似mysql_connect()函数未定义的错误,一般建议使用新的PHPmysqli或者pdo扩展进行替换。当然也可以检出遗留版本的支持MySQL扩展的PHP7代码自行编译安装了,不过需要注意的就是MySQL扩展可是完全没有后续更新的了。
安装前准备
查看当前扩展
查看当前PHP7.1自带扩展:
1
2
3
4
5
6
7
8
9
[root@opstrip.com php-7.1.5]# ls ext bcmath dom gd json oci8 pdo_firebird posix skeleton sysvsem xmlwriter bz2 enchant gettext ldap odbc pdo_mysql pspell snmp sysvshm xsl calendar exif gmp libxml opcache pdo_oci readline soap tidy zip com_dotnet ext_skel hash mbstring openssl pdo_odbc recode sockets tokenizer zlib ctype ext_skel_win32.php iconv mcrypt pcntl pdo_pgsql reflection spl wddx curl fileinfo imap mysql pcre pdo_sqlite session sqlite3 xml date filter interbase mysqli pdo pgsql shmop standard xmlreaderdba ftp intl mysqlnd pdo_dblib phar simplexml sysvmsg xmlrpc
可以看到MySQL扩展确实已经被移除了,我们可以直接在ext目录下检出老的PHP MySQL扩展代码。
获取PHP MySQL扩展源码
1
2
3
4
5
6
7
[root@opstrip.com ext]# git clone https://github.com/php/pecl-database-mysql mysql --recursive Cloning into 'mysql' ... remote: Counting objects: 145, done . remote: Total 145 (delta 0), reused 0 (delta 0), pack-reused 145 Receiving objects: 100% (145/145), 88.41 KiB | 0 bytes/s, done . Resolving deltas: 100% (65/65), done . Checking connectivity... done .
编译安装MySQL扩展
使用phpize编译
1
2
3
4
5
6
7
8
9
[root@opstrip.com ext]# cd mysql [root@opstrip.com mysql]# ls config.m4 config.w32 CREDITS LICENSE mysql.mak mysql_mysqlnd.h package.xml php_mysql.c php_mysql.h php_mysql_structs.h README.md tests [root@opstrip.com mysql]# /usr/local/php/bin/phpize Configuring for : PHP Api Version: 20151012 Zend Module Api No: 20151012 Zend Extension Api No: 320151012 [root@opstrip.com mysql]# ./configure --with-php-config=/usr/local/php/bin/php-config
安装
1
2
3
[root@opstrip.com mysql]# make && make install [root@opstrip.com mysql]# ls /usr/local/php/lib/php/extensions/no-debug-non-zts-20160303/ mysql.so opcache.a opcache.so
安装完成后需确认MySQL扩展安装是否正确。php.ini配置文件,增加一行:
重新启动php-fpm服务就能在phpinfo里看到MySQL扩展了:
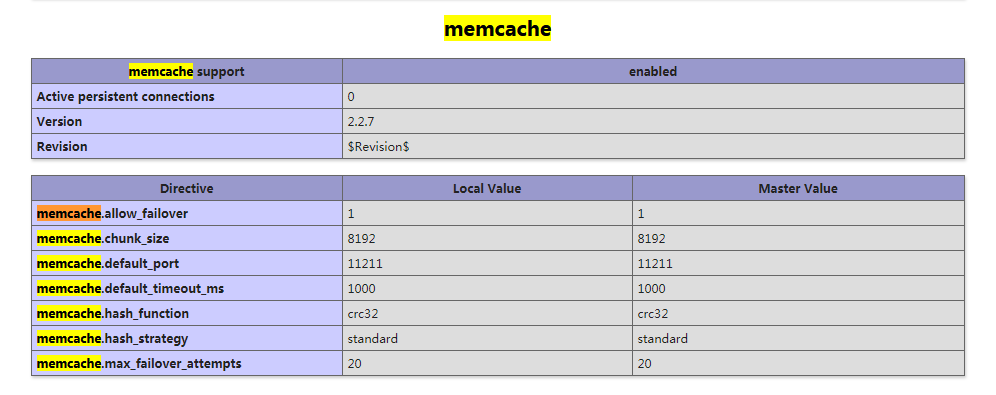
开启Memcache扩展(仅编译安装)
php7.0之前版本正常编译安装memcache扩展就可以了,但是php7.0及以后的版本安装http://pecl.php.net/package/memcache 下的任一款memcache都会报错。https://github.com/websupport-sk/pecl-memcache/archive/php7.zip
下载并编译安装Memcache
1
2
3
4
5
6
7
8
[root@opstrip.com ext]# wget https://github.com/websupport-sk/pecl-memcache/archive/php7.zip [root@opstrip.com ext]# unzip php7.zip [root@opstrip.com ext]# cd pecl-memcache-php7 [root@opstrip.com pecl-memcache-php7]# /usr/local/php/bin/phpize [root@opstrip.com pecl-memcache-php7]# ./configure --with-php-config=/usr/local/php/bin/php-config [root@opstrip.com pecl-memcache-php7]# make && make install [root@opstrip.com mysql]# ls /usr/local/php/lib/php/extensions/no-debug-non-zts-20160303/ mysql.so opcache.a opcache.so memcache.so
添加配置文件
修改php.ini配置文件,增加一行:
1 extension = "memcache.so"
重新启动php-fpm,如果无报错,则打开phpinfo探针页面应该能在网页中找到Memcache项。如下图:
--本配置完。
参考来源: